Standing on deck of the Destroyer H.M.S Tiger, Lieutenant W Middleton peered into the darkness, intently searching for any sign of Royal Navy’s Home Fleet.
Earlier in the day he had sailed from Portsmouth as part of the Home Fleet destroyer flotilla, which numbered twelve with orders to engage with the larger vessels of the Home Fleet.
The destroyers were working in pairs, so as to cover as much area as possible. Looking to starboard, Middleton could just make out the shape of H.M.S Recruit, both ships were acting under orders, so were running with no lights and adding to the visibility problems there was heavy rain.
Wrapped in his oilskin, Middleton was at his post by the 12 Pounder Gun in the bows of the ship. He had 57 men under his command and every man was on duty this night. Most were in the engine room, working and stoking the engines. Due to the conditions a large number were on look out duty searching for the pride of the Royal Navy.
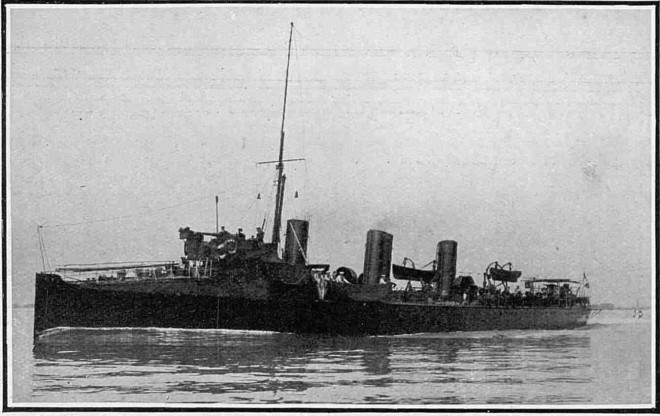
HMS Tiger was a Clydebank -built three funnel 30-knot destroyer purchased by the Royal Navy under the 1899 – 1900 Naval Estimates. She was launched on 19 May 1900. The ship was completed and accepted by the Royal Navy in June 1901.
Despite the exceedingly heavy and rainy conditions, it was an ideal night for delivery of a torpedo and evasion and Middleton had been a lieutenant in the Navy since 1901 and a commander since 1905 so the conditions didn’t faze him.
At a little after 8pm and to the shock of both commanders, the enormous shape of the capital ship H.M.S Prince George, flying the flag of Rear-Admiral Farquhar suddenly loomed out of the darkness.
Unbeknown to both of them, following the Prince George were the heavy cruisers, Berwick, Essex, Argonaut, Forste and Gladiator.
The shock of seeing a Capital Ship emerging from the darkness soon dissipated, and the crews of both destroyers leapt into action. The Recruit was the lead ship and attacked from the port side, both ships firing torpedoes at Prince George.
As the Prince George passed by, the Tiger instead of following the Recruit, altered her course to port which brought her across the stern of the Prince George but to the horror of Middleton, it also brought her across the course of the following H.M.S Berwick.
On the Berwick the lookouts bellowed a warning but there was no time for evasive manoeuvres and the ship braced itself for impact. On the Tiger the full horror that was about to unfold must have hit Middleton hard.

The 9,800 ton H.M.S Berwick.
The 9,800 ton Berwick was travelling at 10 knots and smashed into the 400 ton Tiger between the second and third funnels with such force that the Tiger was torn in two.
The forepart, on which Lieutenant Middleton and most of the deck hands were stationed immediately sank and the afterpart, after floating clear of the cruiser, went down in three minutes. Engineer-Lieutenant Vinning, who was on the afterpart gave orders for every man to come up below and for the boats to be launched, but before this order could be carried out and almost as the last man appeared on deck, the vessel sank.
The Berwick, Gladiator and other vessels in the neighbourhood immediately switched their searchlights on and swept the ocean looking for survivors, they also lowered boats and most of the men who had been stationed on the afterpart of the destroyer, and who were by this time struggling in the water were picked up. Lieutenant Middleton and his men in the Forepart were not so lucky, it sank with all hands.

Lieutenant W.E. Middleton. He joined the Navy in 1894 and received his Lieutenancy in 1901.
Of the crew of 58 only 23 men were picked up and returned to Spithead.
An official inquiry was set up to look into the circumstances of the sinking and all surviving crew members gave their account of the disaster and were then confined to barracks to stop them giving statements before the proceedings were completed.
A former naval officer gave his opinion to the Standard newspaper:
“After firing at the Prince George, which led the big ship line, the Tiger then passed under the stern of that ship, and in doing so was struck by the Berwick, which was next in astern. There is little reason to believe that the steering gear gave out at the crucial moment. Far more probable is that those on the bridge of the ill fated destroyer never saw the Berwick at all.
The distance between the stern of the Prince George and the bow of the Berwick, supposing the fleet to have been in station at two cables, would have been approximately, 270 yards. The fleet is believed to have been travelling at ten knots, which is the equivalent to a speed of 330 yards a minute.

Lieutenant Middleton and his Crew of H.M.S Tiger.
The gap through which the Tiger attempted to pass would therefore have been open for, approximately three-quarters of a minute only, during which time the Tiger at 21 Knots, could cover 600 yards. All evidence, therefore is that the destroyer would never intentionally have intended to cut through the line, even apart from the knowledge they would alter course to avoid her torpedoes. Hence the strong assumption that she was ignorant of the Berwick’s position.”
The Deputy Judge Advocate during the Court Martial in Portsmouth certainly agreed with this assessment:
The Court finds that no blame is attributable to any of the surviving members of the crew of the Tiger and that there is no evidence to show why she altered course to port instead of following her leader; and as there is no evidence on this point, the court considers that no blame can attributed to any particular deceased crew member.
The Court is of the opinion that the Berwick must have been visible from the Tiger when she altered her course to port. The court further finds that from the evidence it has had before it, no blame is attributed to any other person for this lamentable accident and that there was not sufficient time from the time of the Tiger been sighted from the Berwick for the latter to have avoided or prevented the collision; and that the court further consider that, when the collision was seen to be inevitable all proper steps were taken on board the Berwick to lessen the shock collision and save lives.

The dead being brought ashore.
List of Crewmen killed:
- William E Middleton Lieutenant and Commander
- Christopher J Dunaway Gunner
- Ernest Alexander Kingham Officer’s Steward 2nd Class
- Thomas Worrall Stoker 1st Class
- Frank Manning Stoker 1st Class
- James French P.O 1st Class
- Oliver Goldsmith P.O 2nd Class
- Ralph Tweed Pickett Signalman
- Frederick Bellamy Carter A.B
- Edward John Pipe P.O 2nd Class
- Thomas King A.B
- Joseph Albert Helps A.B
- Frederick George Kinch A.B
- Ernest Matthews A.B
- Frank Holmes Chief Stoker
- George Walter Chard Chief Stoker
- Albert Edward Hayles Stoker Petty Officer
- William Colley Stoker 1st Class
- Willaim Beeson Leading Stoker
- John St Vincent Shaw Signalman
- Joseph Lightfoot Stoker 2nd Class
- George Fletcher Dearnly Stoker 1st Class
- William Alfred Crawley Stoker 2nd Class
- Harry Smith Stoker 1st Class
- George Webb Stoker 1st Class
- Joseph McGarth Stoker 1st Class
- John Mitchell Stoker 1st Class
- William Pritchett A.B
- Edwin Arthur Rich A.B
- James Hargreaves A.B
- George William Readings Stoker 1st Class (Lent from HMS Amethyst)
- Frank Troke Stoker 1st Class (Lent from HMS Amethyst)
- William Hailwood Stoker 1st Class (Lent from HMS Amethyst)
- George Secker Stoker 1st Class (Lent from HMS Amethyst)
- William James Newman* P.O 1st Class (Lent from HMS Amethyst)
* Picked up but since died.

Stokers of HMS Tiger. Many died at their post.
The Standard 4th April 1908 Page 7
The Sketch 10th April 1908 page 16
The Illustrated London News 7th April Page 4.