The Death of a Hero

The snowstorm had been blowing all day and the aerodrome at Calshot, Hampshire had been in lock down most of the day. As the wind whipped the snow around the hangers,  engineers were huddled around heaters trying to keep warm.

In the mess room Flight-Lieutenant Samuel Kinkead was talking with his close friend and fellow pilot Captain Henry Baird. As a former winner of the Schneider Trophy in 1922, Baird was perfectly placed to offer advice to ‘Kink’ as he was known to his friends in his attempt to break the world air speed record. Over cups of steaming hot tea they discussed the course and tactics needed.

The record had been set in previous year in November 1927 by the Italian aviator Major Di Bernardi, flying his Macchi M.52R racing seaplane to a record 297.817 mph. Now five months later the British and Flight-Lieutenant Kinkead were determined to break the record and prepare the Team for the 1929 Schneider Trophy due to be held at Calshot.

As the snowstorm continued to batter the aerodrome, the attempt was looking increasingly unlikely to take place, the engineers were trying to keep Kinkead’s Supermarine S.5 flight ready and the official timekeepers from the Royal Aero Club were losing patience. Baird did his best to keep his friend’s morale up but ‘Kink’ was getting frustrated and spiritless.

kinkead

Kinkead being carried by his engineer to his aircraft prior to the test flight.

Samuel Kinkead was born in Johannesburg, South Africa in 1897 and joined the Royal Naval Air Service in September 1915 and had earned his wings by the end of the year. He was posted to 2 Wing RNAS who were sent to Gallipoli and within three weeks, while flying a Bristol Scout scored his first kill when he shot down a Fokker. He scored a further two kills while flying a Nieuport before contracting Malaria and being sent home to convalesce.

While in England he heard that his older brother had been killed in a flying accident as he trained for his wings but despite the news less than two weeks later he was posted to 1 Naval Squadron to fly Nieuports on the Western Front and within a month had scored two more kills to become an ace.

By the end of the war he had 33 confirmed kills and had been awarded Distinguished Service Cross (with bar) and Distinguished Flying Cross (with Bar). After the war he volunteered to serve with 47 Squadron and was sent to Russia to participate in the Civil War. In October 1919 he was awarded the Distinguished Service Order for a crucial ground attack against a Bolshevik cavalry division near Kotluban, thus saving the city of Tsaritsyn from capture. He also scored a further 3 kills before being posted home in 1921.

He one of the RAF’s most experienced pilot, he had taken part in the 1927 Schneider Trophy and despite having retired after five laps his third lap was the fastest ever recorded for a Biplane Seaplane. Now he was entrusted with beating the Italians and getting the World Speed record back.

At 4pm the weather finally broke and the sun broke over the aerodrome. While the sea was like a mill pond, the visibility wasn’t the greatest and Kinkead seemed undecided if to start but made a snap judgment and informed the Royal Aero Club that the attempt was to go ahead, the timekeepers came out from where they were keeping warm and  took up their positions.

The engineers rolled out the Supermarine S.5 and as Kinkead climbed into the cockpit the late afternoon sunshine glistened of the monochrome bodywork. With a last check with his engineers, the engine roared into life and at ten minutes past five, Kinkead revved up the Napier Lion VIIB engine and took to the water.

S5..

Kinkead climbing into his Supermarine S.5. This picture was taken just 15 minutes before his crash and the RAF lost one of their best.

The Supermarine S.5 was designed by Reginald Mitchell for the 1927 Schneider Trophy  and the S.5 featured composite construction with the semi-monochrome fuselage mainly duralumin including the engine cowlings. The S.5 had a low, braced wing with spruce spars and spuce-ply ribs and a plywood skin. Powered with a 875HP Napier Lion VIIB the planes had come first and second at the race held in Venice. These machines would become the precursor to the famous Spitfires.

Supermarine Napier S.5

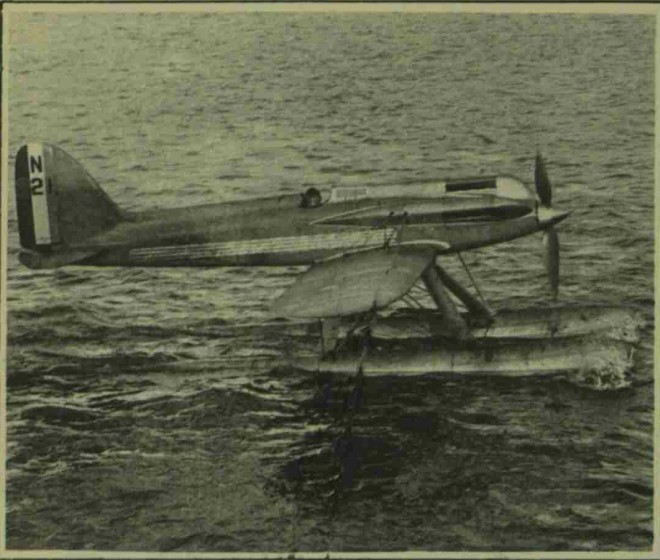
Kinkead in his Supermarine Napier S.5 prior to take off.

As Kinkead taxied down the Solent he appeared to have some difficulties in rising and had to turn and skim across the water for a mile and a half before finally taking off. He flew for ten minutes, putting the plane through its paces. The sleek lines and powerful engine pushed Mitchell’s design through the air before Kinkead landed near Calshot lightship and prepared for his record attempt.

Cockpit

Kinkead in the cockpit of his Supermarine S,5

After a couple of minutes, Kinkead opened up the engine and the machine seemed to take off with less difficulty and it was soon circling above the snow covered Aerodrome. The crowds expectation grew as Kinkead swung down and started to enter the course. Almost immediately disaster overtook him, as he entered the first corner, the spectators reported that they heard that the engines seemed to be roaring at full throttle and the next second the machine dived absolutely vertically into the water at a great speed.

As groans and shouts of alarm went up from the crowd  the machine smashed into the dark waters of the Solent and a column of water rose several feet into the air.

As a shocked silence descended on the crowd a high speed Air Ministry coastal boat raced to the scene but despite being there within two minutes, the machine and Flight Lieutenant Kinkead had sunk without a trace.

Despite crashing into relatively shallow water, it took the Navy two days to find the wreckage, The force of the impact had split the fuselage in half and it seemed that Kinkard had been thrown clear of the wreckage and his body was now at the bottom of the Solent.

The wreckage was taken to Calshot and the controls were laid out on the slipway to check for any technical fault but the inspectors could find nothing technically wrong with the machine. As the inspectors checked the main body of the craft they found Kinkead, minus half this head compressed into the tail unit and they had to cut the tail open to retrieve his body.

DmLa8lrWsAAODRD

Flight-Lieutenant Samuel Kinkard DSC DFC DSO

Despite a RAF inquiry and a Coroner’s Inquest, neither were able to establish a definitive cause for the crash. Various theories have been put forward including either the mist and or the still water caused him to misjudge the turn, a relapse of the Malaria that left him feeling below par to even carbon monoxide poisoning, though the autopsy found no evidence of this.

Perhaps the last word is best left to  D’Arcy Grieg the pilot who took over from Kinkead.

“Flying at over 300 MPH and at no higher than 150 feet ‘Kink’ was never more than half a heart beat from disaster.”

Flight-Lieutenant Samuel Kinkead was buried at All Saints Church Fawley. His Headstone reads:

In memory of Flight Lieutenant Samuel Marcus Kinkead DSO DSC DFC who, on 12 March 1928 while flying at Calshot, gave his life in an attempt to break the world’s speed record.

Pictures courtesy of Mike Stockbridge @Stockotrader

Sources:

The Yorkshire Post 13th March 1928

The Leeds Mercury 13th March 1928

The Sphere 17th March 1928

The Illustrated London News 17th March 1928.

The H.M.S Tiger Disaster 2nd April 1908.

Standing on deck of the Destroyer H.M.S Tiger, Lieutenant W Middleton peered into the darkness, intently searching for any sign of Royal Navy’s Home Fleet.

Earlier in the day he had sailed from Portsmouth as part of the Home Fleet destroyer flotilla, which numbered twelve with orders to engage with the larger vessels of the Home Fleet.

The destroyers were working in pairs, so as to cover as much area as possible. Looking to starboard, Middleton could just make out the shape of H.M.S Recruit, both ships were acting under orders, so were running with no lights and adding to the visibility problems there was heavy rain.

Wrapped in his oilskin, Middleton was at his post by the 12 Pounder Gun in the bows of the ship. He had 57 men under his command and every man was on duty this night. Most were in the engine room, working and stoking the engines. Due to the conditions a large number were on look out duty searching for the pride of the Royal Navy.

Tiger4

HMS Tiger was a Clydebank -built three funnel 30-knot destroyer purchased by the Royal Navy under the 1899 – 1900 Naval Estimates. She was launched on 19 May 1900. The ship was completed and accepted by the Royal Navy in June 1901.

Despite the exceedingly heavy and rainy conditions, it was an ideal night for delivery of a torpedo and evasion and Middleton had been a lieutenant in the Navy since 1901 and a commander since 1905 so the conditions didn’t faze him.

At a little after 8pm and to the shock of both commanders, the enormous shape of the capital ship H.M.S Prince George, flying the flag of Rear-Admiral Farquhar suddenly loomed out of the darkness.

Unbeknown to both of them, following the Prince George were the heavy cruisers, Berwick, Essex, Argonaut, Forste and Gladiator.

The shock of seeing a Capital Ship emerging from the darkness soon dissipated, and the crews of both destroyers leapt into action. The Recruit was the lead ship and attacked from the port side, both ships firing torpedoes at Prince George.

As the Prince George passed by,  the Tiger instead of following the Recruit, altered her course to port which brought her across the stern of the Prince George but to the horror of Middleton, it also brought her across the course of the following H.M.S Berwick.

On the Berwick the lookouts bellowed a warning but there was no time for evasive manoeuvres and the ship braced itself for impact. On the Tiger the full horror that was about to unfold must have hit Middleton hard.

Berwick

The 9,800 ton H.M.S Berwick.

The 9,800 ton Berwick was travelling at 10 knots and smashed into the 400 ton Tiger between the second and third funnels with such force that the Tiger was torn in two.

The forepart, on which Lieutenant Middleton and most of the deck hands were stationed immediately sank and the afterpart, after floating clear of the cruiser, went down in three minutes. Engineer-Lieutenant Vinning, who was on the afterpart gave orders for every man to come up below and for the boats to be launched, but before this order could be carried out and almost as the last man appeared on deck, the vessel sank.

The Berwick, Gladiator and other vessels in the neighbourhood immediately switched their searchlights on and swept the ocean looking for survivors, they also lowered boats and most of the men who had been stationed on the afterpart of the destroyer, and who were by this time struggling in the water were picked up. Lieutenant Middleton and his men in the Forepart were not so lucky, it sank with all hands.

iddleton

Lieutenant W.E. Middleton. He joined the Navy in 1894 and received his Lieutenancy in 1901.


Of the crew of 58 only 23 men were picked up and returned to Spithead.

An official inquiry was set up to look into the circumstances of the sinking and all surviving crew members gave their account of the disaster and were then confined to barracks to stop them giving statements before the proceedings were completed.

A former naval officer gave his opinion to the Standard newspaper:

“After firing at the Prince George, which led the big ship line, the Tiger then passed under the stern of that ship, and in doing so was struck by the Berwick, which was next in astern. There is little reason to believe that the steering gear gave out at the crucial moment. Far more probable is that those on the bridge of the ill fated destroyer never saw the Berwick at all.

The distance between the stern of the Prince George and the bow of the Berwick, supposing the fleet to have been in station at two cables, would have been approximately, 270 yards. The fleet is believed to have been travelling at ten knots, which is the equivalent to a speed of 330 yards a minute.

Tiger2

Lieutenant Middleton and his Crew of H.M.S Tiger.

The gap through which the Tiger attempted to pass would therefore have been open for, approximately three-quarters of a minute only, during which time the Tiger at 21 Knots, could cover 600 yards. All evidence, therefore is that the destroyer would never intentionally have intended to cut through the line, even apart from the knowledge they would alter course to avoid her torpedoes. Hence the strong assumption that she was ignorant of the Berwick’s position.”

The Deputy Judge Advocate during the Court Martial in Portsmouth certainly agreed with this assessment:

The Court finds that no blame is attributable to any of the surviving members of the crew of the Tiger and that there is no evidence to show why she altered course to port instead of following her leader; and as there is no evidence on this point, the court considers that no blame can attributed to any particular deceased crew member.

The Court is of the opinion that the Berwick must have been visible from the Tiger when she altered her course to port. The court further finds that from the evidence it has had before it, no blame is attributed to any other person for this lamentable accident and that there was not sufficient time from the time of the Tiger been sighted from the Berwick for the latter to have avoided or prevented the collision;  and that the court further consider that, when the collision was seen to be inevitable all proper steps were taken on board the Berwick to lessen the shock collision and save lives. 

Tiger5

The dead being brought ashore.

List of Crewmen killed:

  1. William E Middleton              Lieutenant and Commander
  2. Christopher J Dunaway         Gunner
  3. Ernest Alexander Kingham  Officer’s Steward 2nd Class
  4. Thomas Worrall                      Stoker 1st Class
  5. Frank Manning                       Stoker 1st Class
  6. James French                           P.O 1st Class
  7. Oliver Goldsmith                    P.O 2nd Class
  8. Ralph Tweed Pickett              Signalman
  9. Frederick Bellamy Carter     A.B
  10. Edward John Pipe                  P.O 2nd Class
  11. Thomas King                           A.B
  12. Joseph Albert Helps               A.B
  13. Frederick George Kinch        A.B
  14. Ernest Matthews                     A.B
  15. Frank Holmes                          Chief Stoker
  16. George Walter Chard              Chief Stoker
  17. Albert Edward Hayles            Stoker Petty Officer
  18. William Colley                         Stoker 1st Class
  19. Willaim Beeson                       Leading Stoker
  20. John St Vincent Shaw             Signalman
  21. Joseph Lightfoot                      Stoker 2nd Class
  22. George Fletcher Dearnly       Stoker 1st Class
  23. William Alfred Crawley         Stoker 2nd Class
  24. Harry Smith                             Stoker 1st Class
  25. George Webb                            Stoker 1st Class
  26. Joseph McGarth                        Stoker 1st Class
  27. John Mitchell                            Stoker 1st Class
  28. William Pritchett                     A.B
  29. Edwin Arthur Rich                  A.B
  30. James Hargreaves                    A.B
  31. George William Readings       Stoker 1st Class (Lent from HMS Amethyst)
  32. Frank Troke                               Stoker 1st Class (Lent from HMS Amethyst)
  33. William Hailwood                    Stoker 1st Class (Lent from HMS Amethyst)
  34. George Secker                           Stoker 1st Class (Lent from HMS Amethyst)
  35. William James Newman*       P.O 1st Class (Lent from HMS Amethyst)

* Picked up but since died.

Tiger3

Stokers of HMS Tiger. Many died at their post.

The Standard 4th April 1908 Page 7

The Sketch 10th April 1908 page 16

The Illustrated London News 7th April Page 4.


Death of a famous War dog.

Death of a famous War dog.

From Colchester is announced the death, by poison, of “Drummer” the celebrated dog of the Northumberland Fusiliers.

“Drummer” belonged to Colonel Ray, principal Medical Officer at the Military Hospital, served through the last Egyptian campaign and was in the fire line at Omdurman, where he snapped at bullets thinking they were flies.

At the beginning of the South African War “Drummer” went out with his regiment and served at Magersfontein, the relief of Kimberley and Wynberg, at which last place he was wounded in the shoulder.

21761822_1359795207462812_7048032459446787613_n

It was Queen Victoria’s intention to award him a medal, but technical difficulties arose and “Drummer” had to be content with miniature medals and clasp, which though bore no official sanction served to remind his friends of the many battles he had taken part off.

His decorations commemorated the engagements of Diamond Hill, Johannesburg, Paardeberg, Driefontien, Kimberley, Belmont , and Modder River. He had the further distinction of being the only dog which Lord Methuen permitted to accompany his force from Orange River.

The Illustrated London News 1st February 1902.

Indian Pipers

Native troops.

Many Indian Regiments adopted the Bagpipes after coming into contact with Highland Regiments.
The regiments from the North West Frontier of India especially had an close relationship with the Highlanders and eagerly adopted the Pipes and some regiments even had their own ‘Clan’ Tartan.


Sikh Pipers

Sikh Pipers from the Punjab

Punjabi Pipers

Punjabi Pipers (Mohammedans)

Hazara

Chacha Hazara Pipers

Sikh Pipe Major

Sikh Pipe-Major

The Graphic 6th November 1915.

Empire Day (24th May) Parade, Shanghai

Sunday Matinee…

Empire Day (24th May) Parade Shanghai 1920’s.

This great video (no Sound) shows British Officials and Military officers enjoying Empire Day (24th May). The Video shows British Sailors, British Army units, including a Scottish Highland regiment and Indian Army Regiments parading and then marching past. A fascinating glimpse into the Empire at its highest extent.

Pathe News

From Hong Kong, the Gibraltar of the East

This article from the Illustrated London News (June 30th 1900.) shows the men of the Hong Kong Regiment preparing to depart to Tientsin

“From Hong Kong, the Gibraltar of the East , a force has been moved towards Tientsin consisting of 300 Welsh Fusiliers and 900 Indian troops.

The Hong Kong Regiment is under the command of Lieutenant-Colonel Retallick of the 45th Sikhs. He is forty-three years of age and saw service in the Afghan War of 1880, for his conduct in which he was decorated and mentioned in Dispatches.

18403812_1248323375276663_7803366448247231947_o

The Hong Kong Regiment ordered on active service. (Native Ranks in Khaki.)

18404096_1248323731943294_4198411373364227851_o

First Colours of the Hong Kong Regiment presented in 1895 by Sir William Robinson.

18359155_1248324241943243_6949751616257067502_o

Types of the Hong Kong Regiment (Natives Ranks in Red).

The Life of Colour Sergeant Knight.

This is an extended article from what I posted on Facebook earlier this week.

In July 1856 at the end of the Crimean War the returning troop gathered at the Military camp at Aldershot for a Victory parade through the streets of London.  Early photography pioneers Robert Howlett and Joseph Cundall were also at the camp and in a series called “Crimean Heroes 1856” captured in this new medium some of these conquering heroes.

The picture below is of Colour-Sergeants J Stanton, Kester Knight and W Bruce, of the Royal Sappers and Miners freshly returned from Turkey, all three were grizzled veterans and had served in the Crimea for the duration of the War.

Colour-Sergeants J Stanton, Kester Knight and W Bruce, Royal Sappers and Miners, 1856

Colour-Sergeants J Stanton, Kester Knight and W Bruce, Royal Sappers and Miners, 1856

Kester Knight was born 1827 in Haslemere Surrey and was apprenticed as a carpenter. On the 12th May 1846 aged 19 he joined The Royal Sappers and Miners at Woolwich and listed carpenter as his profession.

Knight proved to be a model solider and steadily moved up the ranks, While posted in Gibraltar he was promoted to 2nd Corporal on the 9th July 1851 and then full Corporal on the 23rd February 1854.

During the spring and summer of 1854 the clouds of war were gathering across Europe as the empires of Britain, France and Russia fought over the dying carcass of the Ottoman Empire. With public opinion across Britain demanding war the British Government dispatched its biggest Army overseas since the Napoleonic Wars.


The Crimean War (October 1853 – February 1856), also known in Russian historiography as the Eastern War of 1853–1856 (Russian: Восточная война, Vostochnaya Voina), was a conflict in which Russia lost to an alliance of France, the United Kingdom, the Ottoman Empire, and Sardinia. The immediate cause involved the rights of Christian minorities in the Holy Land, which was controlled by the Ottoman Empire. The French promoted the rights of Catholics, while Russia promoted those of the Orthodox Christians. The longer-term causes involved the decline of the Ottoman Empire and the unwillingness of the United Kingdom and France to allow Russia to gain territory and power at Ottoman expense. It has widely been noted that the causes, in one case involving an argument over a key, have never revealed a “greater confusion of purpose”, yet led to a war noted for its “notoriously incompetent international butchery.


Part of this force included Engineers and men of the Miners and Sappers who had been stationed at Gibraltar since 1849, Corporal Knight landed on the Crimean peninsular with the rest of his regiment on 14th September 1854. They immediately set about getting the stores ashore and setting up a camp for the army.

The British and French Armies marched in land and fought the first major battle of the campaign on the banks of the Alma  and repulsed the Russian defenders but failing to follow up the beaten and retreating Russians gave them the chance to retreat to the safety of Sebastopol and its large Star Fort.

Believing that the Northern approaches to the city were too well defended the British and French Commanders agreed to attack the city from the south. As the army settled down for the siege of the city the men of the Royal Engineers and Miners and Sappers came into their own.

Trenches, gun emplacements and the army encampment were all built and by the 26th of October the British had 73 guns ready for the bombardment of the city walls. Corporal Knight would’ve lead work parties of infantrymen who would dig trenches and build gun embrasures under the direction of a Royal engineer officer (one who would later be Lord Wolseley).

He would also have fought of Russian raiding parties who would sortie out from the city to try and destroy trenches, guns or capture the tools carried by the men.


As a further consequence, the front was not protected by sentries, so that a sortie or surprise of some sort was just might have been anticipated. As we have seen there was a sortie and the surprise was complete, but Wolseley was equal to the occasion.

The working-party, finding themselves surrounded, cast down their tools or arms and bolted to a man. In vain the officers did all the could to stop the stampede. Wolseley seized by the belt one man who was in the act of flying, but was instantly knocked down by another fellow who took this irregular method of releasing his comrade, Wolseley found there was nothing between himself and the Russians but the gabions which they were pulling down with celerity.

Looking about him with the intent of rallying his men, he found that he was alone; all had fled, the officers, recognising the futility of resistance without their men, being the last to retire.

Lord Wolseley, A memoir.


On the 1st of April 1855 Knight was promoted to Sergeant and 4 months before peace was declared he was promoted to Colour-Sergeant.

For his service in the Crimea, Knight was awarded the Queen’s Crimea (Inkermann and Sebastopol clasps), the Turkish Crimea Medal and the French awarded him the French Médaille Militaire his citation reading

Joined the Army at Scutari in May, 1854. Present at every bombardment. Specially selected by Colonel Tylden for important daily duties in the trenches of the right attack, and was subsequently strongly recommended by him for promotion which he received”. 

He sailed for home on the 19th January 1856.

He was home for less than a year before sailing for China in time for the start of the Second Opium War.


The Second Opium War, the Second Anglo-Chinese War, the Second China War, the Arrow War, or the Franco-British expedition to China, was a war pitting the British Empire and the Second French Empire against the Qing dynasty (present day China), lasting from 1856 to 1860.


Little is known of Knight’s service in China but he served a total of three years in china and was awarded The China Medal 1857-1860 with clasps for Taku Forts 1860 and Pekin 1860.

After returning to Britain in the Autumn of 1861 he was posted to the Royal Engineers depot at Chatham and on the 6th May 1862 received his final promotion to Sergeant Major.

His army service was exemplary and on his regimental record a note was added which stated:

Conduct has been very good and he was in the possession of one good conduct badge when promoted and would had he not been promoted have now been in possession of five good conduct badges. 

After serving for 22 years 295 days and being awarded the Meritorious Service Medal in 1869 Sergeant-Major Kester Knight retired.

Hampshire Telegraph and Sussex Chronicle January 20th 1869

Hampshire Telegraph and Sussex Chronicle January 20th 1869

In 14th July, 1878 Knight he was rewarded for his service with a post of Yeoman of the Guard at the Tower of London. He lived at the tower with his wife and was one of 39 Yeomans on duty when a Fenian terrorist attacked the Tower with dynamite.

Yeoman Warder Kester C. Knight http://www.soldiersofthequeen.com/

Yeoman Warder Kester C. Knight  Water Lane not far from the Traitor’s Gate in the Tower of London.


The Cornishman Thursday 29th January 1885

The Cornishman Thursday 29th January 1885

Knight was a Yeoman for 16 years before dying on the 11th June, 1894 at the Tower. So ended the life of this remarkable Victorian solider.

Peace for Friedrich Brandt

A little off topic but hope you will indulge me…

Peace for Friedrich Brandt

As Friedrich Brandt marched with his comrades of the Kings German Legion (KGL) on the morning of the 18th June 1815 little did he know that his death on the fields of Waterloo would trigger a social media war 200 years later.

The KGL had a distinguished fighting record throughout the battles against France and Napoleon, they had served with the Duke of Wellington in the Spanish Peninsular and the KGL were some of the most experienced troops Britain could call on.

During the fighting at the Battle of Waterloo, the climatic final battle of the Napoleonic Wars the KGL suffered heavy casualties in the fighting around the farm at Hougoumont including it seems a young man with a slight curve to his spine who slumped to the ground as a musket ball smashed into his chest.

Hurriedly buried, his comrades moved on and the young man disappeared into history…and there the story may have ended had the carpark near the Lion Monument not been upgraded in time for the 200th anniversary of the battle

Lion Hill, La Butte de Lion, was built between 1824 and 1826, and is dedicated to the soldiers who died at the Battle of Waterloo

Lion Hill, La Butte de Lion, was built between 1824 and 1826, and is dedicated to the soldiers who died at the Battle of Waterloo

In June 2012 while the upgrades were being carried out a skeleton was discovered under the tarmac of the carpark. The first complete skeleton (well minus the skull!) to be found from the battle and with the musket ball that caused his death still lodged in his ribs, the discovery caused a sensation. (Daily Mail 5th April 2015)

Remains of Friedrich Brandt complete with musket ball still lodge in his ribs.

Remains of Friedrich Brandt complete with musket ball still lodge in his ribs.

With the artefacts found on him and a lot of detective work the skeleton was identified as that of Friedrich Brandt, a German from the state of Hannover fighting as part of King George III German Legion.

Now you would hope that as a soldier who had died in action his remains would be treated with dignity and given a full military burial either in his home state or in a cemetery near the battlefield. What instead happened was it was decided that his remains were to be put on display at the museum near the Butte de Lion.

Again this could’ve been the end of the story had the German Historian Rob Schaefer (@Gerarmyresearch) got involved. He quite rightly pointed out that displaying the body was disrespectful and tacky and certainly didn’t fulfil and scientific purpose.

He also pointed out that would he have been put on display if he had been a British Guardsman or a French Old Guard? There is precedent with the discovery and fully military funeral for a British guardsman found in Holland.

Using the power of social media Herr Schaefer galvanized fellow historians to start a Twitter campaign using the hashtag #peaceforFriedrichBrandt to highlight the cause and to pressure the museum and the Belgium tourist board to reconsider the display.

Very soon hundreds of Tweets carrying the hashtag were being tweeted and retweeted and many respected Military Historians were getting behind the campaign. A facebook page (Peace for Friedrich Brandt)  quickly garnered over 500 likes.

The reaction of the Belgium Tourist Board was disappointing to say the least, going onto the offensive they issued a statement saying that the decision to display the remains came after carefully consideration by a board of experts who declared it in the public interest to display the body.

They didn’t manage to say what scientific purpose this had and you have to feel that public titillation and the financial implications of the 200th Anniversary of the battle had more influence on their decision.

In this day and age do we really need to display human remains for the public to gawp at? A plaster cast of the bones would’ve served the same purpose and allowed the body to be reinterred with dignity and respect.

This campaign has bigger implications than just the bones of Friedrich Brandt it also brings into question the whole treatment of human remains by museum and institutions and what purpose they serve by displaying them.

My own personal opinion is that NO human remains, irrespective of age need to be on display, by all means run the full battery of scientific tests, takes casts, do what you need to do for us to understand everything we can about that person but they then should be reburied with as much dignity as possible.

If you agree that Friedrich Brandt should be buried with dignity then please do get involved, Tweet using the Hashtag#peaceforFriedrichBrandt  and like the Facebook page, if we can cause enough fuss then we may be able to get the museum to see sense.

Friedrich Brandt was a soldier who did his duty, he died fighting for the freedom of his homeland and fought as part of the British Army. He deserves much more than to end up in a display case

The Amritsar Massacre

On the morning of Sunday 13th April 1919 thousands of protesters had gathered in the Jallianwala Bagh garden in the holy city Amritsar, Punjab. Mingled with the protesters were Sikh pilgrims celebrating the festival of Baishakhi.

Numbering about 15,000 the crowds was largely peaceful and demanded the release of two protest leaders who had been arrested earlier in the week and moved to a secret location.

Ignoring the curfew, ordered by the Indian Government after various violent acts across the PunJab, the crowd were determined to have their demands met. On hearing of this illegal gathering and fearing the start of a major rebellion, the local military commander Brigadier-General Reginald Dyer gathered 50+ Gurkhas from the garrison and led them to the gardens.

On arrival at the gardens the vast crowd shocked Dyer and he immediately ordered his men into position on a bank overlooking the crowd. As the situation dawned on him, Dyer came to believe he was about to save the Raj from rebellion.

The gardens were surrounded by large walls and buildings and the few exits were narrow and many were also locked or blocked by Dyer’s men.

Dyer was determined to punish the crowd and prevent it spreading further so without warning he gave his men the order to fire.

Brigadier-General Dyer. Military Commander Amritsar 1919

Brigadier-General Dyer. Military Commander Amritsar 1919

With the Gurkhas firing indiscriminately the crowd began to panic and move towards the exits. In the following stampede many women and children were crushed underfoot. The protesters now began to crowd around the blocked and locked exits and the soldiers started to target these large groups of protesters.

As the bullets from the soldiers .303 rifles began to find their targets the dead and injured began to further block the exits, panic began to grow as the protesters realized they had no where to go or hide. Men, women and children started to fall to the accurate shots of the battle hardened Gurkhas.

The Jallianwala Bagh garden 1919. Taken after the Massacre.

The Jallianwala Bagh garden 1919. Taken after the Massacre.

For a full ten minutes the soldiers kept up this fire until their ammunition began to get low and Dyer gave the order to cease fire, A deathly silence settled over the gardens punctuated by the cries and groans of the injured.

As his men shouldered their arms, Dyer could look at the scene in front of him with the satisfaction of a job well done.

Aftermath

The official body count for the massacre was put by the British authorities as 379 killed and approximately 1000 wounded although the Indian National congress’s own investigation put the figure closer 1500 casualties including 1000 killed.

Brigadier General Dyer was lauded by conservative elements throughout the Empire as a hero and saviour of the Raj. After he reported to his superiors that he had been “confronted by a revolutionary army”, Lieutenant-Governor Michael O’Dwyer wrote in a telegram sent to Dyer: “Your action is correct and the Lieutenant Governor approves.”

Martial law was imposed on most of the Punjab and rigorously enforced by the Indian authorities.

Not everyone approved of his actions and the British government was ferocious in its condemnation of the action. Secretary of State for War Winston Churchill called it monstrous and former Prime Minister H H Asquith described it as “one of the worst outrages in the whole of our history“.

Churchill went even further during a debate in the House of Commons in July 1920.

“The crowd was unarmed, except with bludgeons. It was not attacking anybody or anything… When fire had been opened upon it to disperse it, it tried to run away. Pinned up in a narrow place considerably smaller than Trafalgar Square, with hardly any exits, and packed together so that one bullet would drive through three or four bodies, the people ran madly this way and the other. When the fire was directed upon the centre, they ran to the sides. The fire was then directed to the sides. Many threw themselves down on the ground, the fire was then directed down on the ground. This was continued to 8 to 10 minutes, and it stopped only when the ammunition had reached the point of exhaustion.”

Churchill urged the government to punish Dyer and succeeded in persuading the House of Commons to forcibly retire Dyer in 1920.

Despite this censure, Dyer was still seen as a hero in some eyes, the House of Lords passed a resolution praising his actions and in India he was seen as the saviour of the Raj by British society.

The Streets of Amritsar bearing the signs of Riots that broke out after the Massacre. 1919

The Streets of Amritsar bearing the signs of Riots that broke out after the Massacre. 1919

Dyer himself was unrepentant over his actions and during the Hunter Commission (set up to investigate the event) stated that:

“I think it quite possible that I could have dispersed the crowd without firing but they would have come back again and laughed, and I would have made, what I consider, a fool of myself.”

and when asked if :

supposing the passage was sufficient to allow the armoured cars to go in, would you have opened fire with the machine guns?

He replied:

I think probably, yes.

He stated that he intended to strike fear into the Punjab and instill a fear of the British to deter further rebellions.

Brigadier General Reginald Dyer died in 1927 still believing he had acted with honour and had saved the jewel in the Crown with his actions.

The Amritsar Massacre shocked the world, already numb to the slaughter of the First world war. It was seen by many as the beginning of the end of British rule in India. Many in the Punjab felt betrayed by the action after the service and losses the Punjab had given during the war.

A relatively peaceful province became the center of Indian resistance to British rule and the people of the Punjab lead the way to Indian independence.


Review of Empire, Faith and War: The Sikhs and World War One.

This week the SOAS University of London in partnership with the UK Punjabi Heritage Association (UKPHA) launched their landmark exhibition Empire, Faith and War: The Sikhs and World War One.

Hosted at the Brunei Gallery London, this exhibition tells the story of the important, and at times crucial role the Indian Army and in particular the Sikhs played in World War One.

Using a range of exhibits the curator’s hope to bring this little known story to a greater audience and encourage modern Sikhs to investigate their own past and roles their ancestors may of played in World War One.

SAM_9716

In order to give the visitor a greater understanding of the Sikh contribution the exhibition isn’t just limited to World War One.

It tries to give a brief history of the Sikhs themselves, starting in the 15th Century it follows the Sikhs journey from the creation of their own Empire under Maharaja Ranjit Singh, the first clashes with the British Empire, to the immense contribution and sacrifice during both world wars and then finally to the calls for independence and partition.

The Exhibition hall is well laid out and as you move through hall, the exhibits follow a logical order, starting with early Sikh history, the outbreak of War, life on the Western Front etc each subject following seamlessly into the next giving the visitor a clear narrative and making it very easy to understand the chronological order of the history.

One of my favourite sections was about Sikhs in German POW camps. The Germans seemed to have been fascinated by the Martial nature of the Sikhs and even made sound recording of them which you can listen to.

Images of Sikh prisoners of War from German Sources.

Images of Sikh prisoners of War from German Sources.

The Exhibition has managed to secure some amazing items from the likes of the British Library, National Army Museum and even from the Queens private collection.

There are some real standout pieces on display and some of my favourites includes a gold embossed Sword and pistol owned and used by Maharaja Ranjit Singh and a stunning book of X-rays which shows the injuries suffered by some Sikhs on the Western Front.

The real star of the show, in my opinion is the stunning artwork and pictures that adorn the walls. With everything from colourful recruitment posters, calling the lions of the Empire to fight to a range of pictures showing life in the trenches they really bring to life the vast contribution that the Indian Army made during World War one.

sikh

As Amandeep Madra (chair of the UKPHA) said at the launch of the exhibition:

The British Indian Army’s contribution was actually far greater than the better-known efforts of the white commonwealth countries of Australia, Canada and New Zealand put together. The non-white Empire’s efforts have largely been forgotten and their heroism and sacrifices omitted from mainstream narratives, or left as somewhat forlorn footnotes of history.

And yet men from Undivided India in particular ensured that the Western Front wasn’t lost in those first vital months, and then went on to fight the war’s forgotten fronts in Mesopotamia, Arabia, Palestine, North Africa and beyond. Their contribution has never adequately been recognised or even told.

By telling the Sikh story we want to change that and remind the world of this wider undervalued contribution of the non-white British Empire. This is British history and a story that helps explain much about modern Britain as well as filling in a tragically missing piece of First World War history.

This exhibition certainly goes some way to rectifying that.

The Exhibition runs until the 28th of September 2014 and entry is free.